MICROSOFT-WORD 2007: SETTING YOUR WORD ENVIRONMENT
Introduction
Before you begin creating documents in Word, you may want to set up your Word environment and become familiar with a few key tasks
such as how to minimize and maximize the Ribbon, configure the Quick
Access toolbar, display the ruler, and use the Word Count and Zoom
tools.
Tasks to set up and use Word
To minimize and maximize the Ribbon:
- Right-click anywhere in the main menu.
- Select Minimize the Ribbon in the menu that appears. This will toggle the Ribbon on and off.

The check mark beside Minimize the Ribbon indicates that the feature is active.
The new tabbed Ribbon system
replaces traditional menus in Word 2007. It is designed to be
responsive to your current task and easy to use; however, you can choose
to minimize the Ribbon if you would rather use different menus or keyboard shortcuts.
To add commands to the Quick Access toolbar:
- Click the arrow to the right of the Quick Access toolbar.
- Select the command you want to add from the drop-down list. It will appear in the Quick Access toolbar.
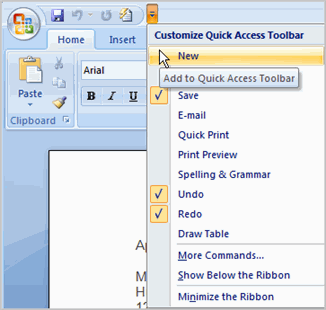
The
Save, Undo, and Redo commands appear by default in the Quick Access
toolbar. You may want to add other commands to make using specific Word
features more convenient for you.
To display or hide the Ruler:
- Click the View Ruler icon over the scrollbar.
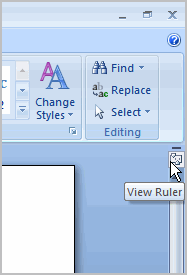
The View Ruler icon works as a toggle button to turn the Ruler on and off.
MICROSOFT-WORD: TEXT BASICS
Challenge!
- Open Word 2007 on your computer. A new blank document will appear on the screen.
- Make sure your Ribbon is maximized.
- Display the Ruler.
- Add any commands you want to the Quick Access toolbar.
- Close Word without saving the document.
Introduction
It's important to know how to perform basic tasks with text when working in a word processing application. In this lesson, you'll learn the basics of working with text, including how to insert, delete, select, copy, paste, and drag and drop text.
Working with text
To insert text:
- Move your mouse to the location where you want text to appear in the document.
- Left-click the mouse. The insertion point appears.
- Type the text you want to appear.
To delete text:
- Place your cursor next to the text you want to delete.
- Press the Backspace key on your keyboard to delete text to the left of the cursor.
- Press the Delete key on your keyboard to delete text to the right of the cursor.
To select text:
- Place the insertion point next to the text you want to select.
- Left-click your mouse. While holding it down, drag your mouse over the text to select it.
- Release the mouse button. You have selected the text. A highlighted box will appear over the selected text.
When you select text or images in Word, a hover toolbar with formatting options appears. This makes formatting commands easily accessible, which can save you time.
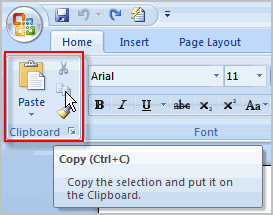
To copy and paste text:
- Select the text you want to copy.
- Click the Copy command on the Home tab.
- Place the insertion point where you want text to appear.
- Click the Paste command on the Home tab. The text will appear.

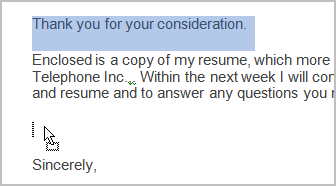
To drag and drop text:
- Select the text you want to copy.
- Left-click your mouse, and drag the text to the location where you want it to appear. The cursor will have a text box underneath it to indicate that you are moving text.

- Release the mouse button, and the text will appear.
If text does not appear in the exact location you want, you can click the Enter key on your keyboard to move the text to a new line.
Challenge!
Use the cover letter or any other Word document you choose to complete this challenge.- Open an existing Word document.
- Select a sentence.
- Copy and paste the sentence from one location in the document to another.
- Select another sentence.
- Drag and drop it to another location in the document.
- Select the entire document.
- Change the font style, size, and color.
MICROSOFT-WORD: SAVING DOCUMENT
Introduction
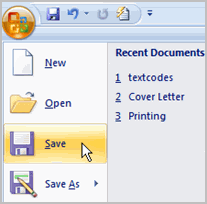 It's important to know how to save the documents you are working with. There are many ways you share and receive documents, which will affect how you need to save the file.
Are you downloading the document? Saving it for the first time? Saving it as another name? Sharing it with someone who doesn't have Word 2007? All of these factors will affect how you save Word documents. In this lesson, you will learn how to use the Save and Save As commands, how to save as a Word 97-2003 compatible document, and how to save as a PDF.
How to save documents
To use the Save As command:
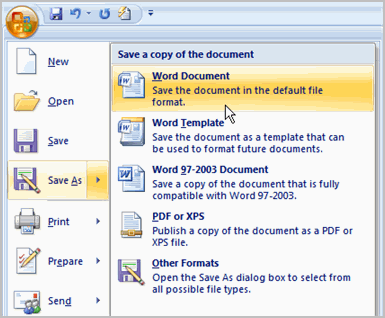
- Click the Microsoft Office button.
- Select Save As
 Word Document. The Save As dialog box appears.
- Select the location where you want to save the document using the drop-down menu.
- Enter a name for the document.
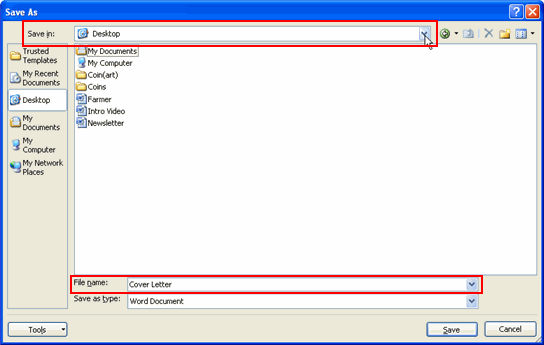
- Click the Save button.
To use the Save command:
- Click the Microsoft Office button.
- Select Save from the menu.
Using the Save command saves the document in its current location using the same file name. If you are saving for the first time and select Save, the Save As dialog box will appear.
To Save As a Word 97 - 2003 document:
- Click the Microsoft Office button.
- Select Save As
 Word 97-2003 Document.
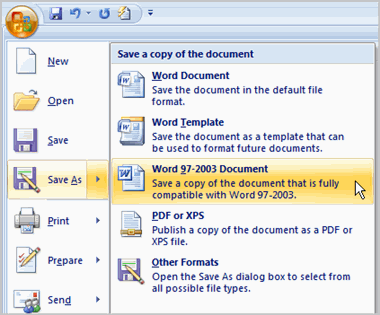
- Select the location where you want to save the document using the drop-down menu.
- Enter a name for the document.
- Click the Save button.
To download the PDF extension:
- Click the Microsoft Office button.
- Select Save As
 Find add-ins for other file formats. This will open your web browser to the Microsoft site.
 - Follow the instructions on the Microsoft site for downloading the extension.
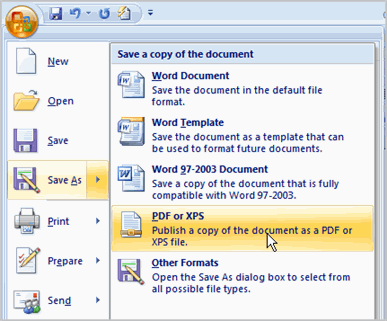
To save as a PDF:
- Click the Microsoft Office button.
- Select Save As
 PDF. The Save As dialog box will appear.
- Select the location where you want to save the document using the drop-down menu.
- Enter a name for the document.
- Click the Publish button.
Compatibility mode
Sometimes you may need to work with documents that were created in earlier versions of Microsoft Word, such as Word 2003 or Word 2000. When you open these types of documents, they will appear in Compatibility mode.
Compatibility mode disables certain features, so you'll only be able to access commands found in the program that was used to create the document. For example, if you open a document created in Word 2003, you can only use tabs and commands found in Word 2003.
If you want access to all of the Word 2007 features, you can save the document in the Word 2007 file format.
To exit Compatibility mode:
- Click the Microsoft Office button.
- Select Save As
 Word Document.
Challenge!
Use the cover letter or any other Word document you choose to complete this challenge.
- Open an existing Word document.
- Save the document with the file name trial.
- Save the same document as a PDF file.
- Close the document.
- Open another existing Word document.
- Save the document so it is compatible with Word 2003.
- Close the document.
MICROSOFT WORD: PROOFING FEATURE
Introduction
 Worried about making mistakes when you type? Don't be. Word provides you with several proofing features
that will help you produce professional, error-free documents. In this
lesson, you will learn about the various proofing features, including
the Spelling & Grammar tool.
Worried about making mistakes when you type? Don't be. Word provides you with several proofing features
that will help you produce professional, error-free documents. In this
lesson, you will learn about the various proofing features, including
the Spelling & Grammar tool.Using proofing features
Line colors
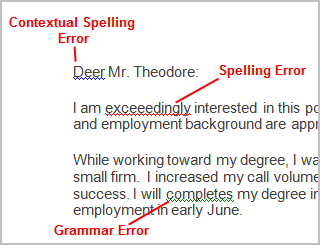
By default, Word automatically checks your document for spelling and grammar errors. These errors are indicated by colored wavy lines.
- The blue line indicates a contextual spelling error.
- A contextual spelling error is when an incorrect spelling of a word is chosen. For example, if you write Deer Mr. Theodore at the beginning of a letter, deer is a contextual spelling error because dear should have been used. Deer is spelled correctly, but it is used incorrectly in this letter.
- The red line indicates a misspelled word.
- The green line indicates a grammatical error.
To use the spelling check feature:
- Right-click the underlined word. A menu will appear.
- Select the correct spelling of the word from the listed suggestions.
- Left-click your mouse on the word. It will appear in the document.
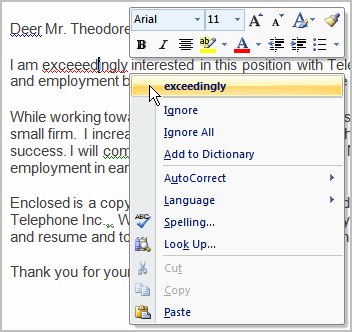 You can choose to ignore an underlined word, add it to the dictionary, or go to the Spelling dialog box.
To use the grammar check feature:
- Right-click the underlined word. A menu will appear.
- Select the correct word from the listed suggestions.
- Left-click your mouse on the word. It will appear in the document.
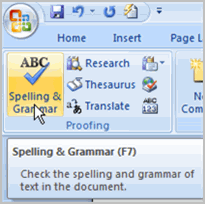
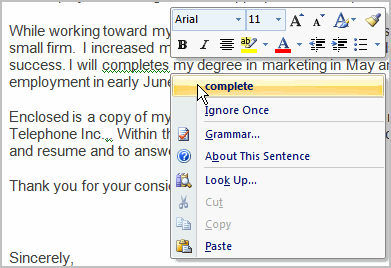 You can also choose to ignore an underlined word, go to the Grammar dialog box, or find out more information about the word and its usage.You can also wait and run the spelling and grammar check after completing the document. Click the Spelling & Grammar command on the Review tab.
Challenge!
Use the cover letter or any other Word document you choose to complete this challenge.
- Open an existing Word document.
- Type the following sentences at the beginning of the document:
- I really enjoy learning an computers and about new skillz.
- I like to take tutorials were I can learn independently.
- Correct the spelling errors in the sentences.
- Correct the grammar mistake that appears in one of the sentences.
- Use the Spelling & Grammar command to check the remainder of the document.
MICROSOFT WORD: WORKING WITH HYPERLINKS
Introduction
 A hyperlink is a piece of text or an image
in an electronic document that can connect readers to another portion
of the document or a different webpage. In addition, a hyperlink can be
used to connect to and open an email client window.
Have you noticed the active links on webpages that allow you to jump from one page to another? You just used one to open this lesson. These are called hyperlinks. You can use these in electronic versions of your Word documents, just like you do in webpages. In this lesson, you will learn the basics of working with hyperlinks, including how to insert and remove them in your Word document.
To insert a hyperlink:
- Select the text or image you want to make a hyperlink.
- Select the Insert tab.
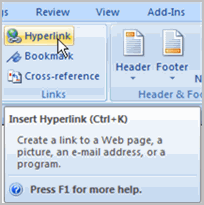
- Click Hyperlink in the Links group. The Insert Hyperlink dialog box appears. If you selected text, the words will appear in the Text to display: field at the top.
- Type the address you want to link to in the Address: field.
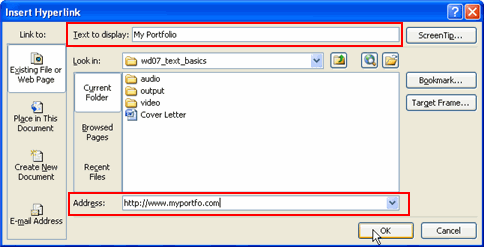
- Click OK. The text or image you selected will now be a hyperlink.
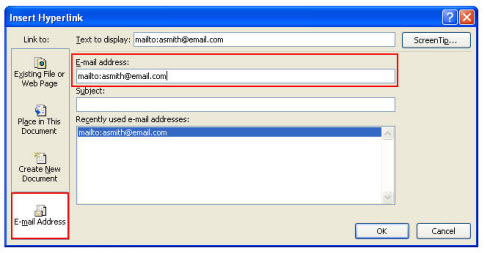
To make an email address a hyperlink:
- Type the email address.
- Highlight the text, and select the Insert tab.
- Click Hyperlink in the Links group, and the Insert Hyperlink box appears.
- On the left of the box where it says Link to: click Email Address.
- The Insert Hyperlink box will change to the one shown above.
- Type the email address you want to connect to in the Email Address box, then click OK.
You can also insert a hyperlink that links to another portion of the same document.Word recognizes many email and web addresses as you type and will format them as hyperlinks automatically after you press the Enter key or spacebar.To remove a hyperlink:
- Select the hyperlink you want to deactivate.
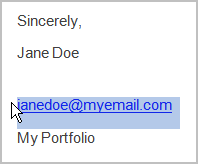
- Select the Insert tab.
- Click Hyperlink in the Links group. The Edit Hyperlink dialog box appears.
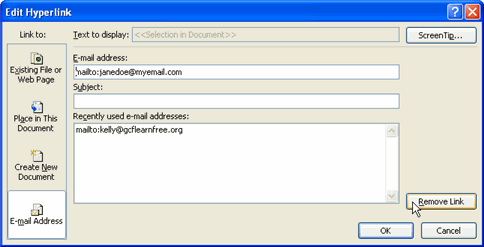
- Click Remove Link.
Challenge!
Use the cover letter or any other Word document you choose to complete this challenge.
- Open an existing Word document.
- Type the following sentence:
- For great computer training, visit JETVENT today!
- Select JETVENT
- Insert a hyperlink that connects to www.jetvent.blogspot.com
- Remove the hyperlink.
MICROSOFT WORD: PRINTING
Introduction
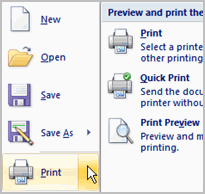 Once you complete your document, you may want to print it for various reasons. This lesson covers the three basic features of printing in Word, including Print Preview, Quick Print, and traditional Print.
To preview the document before printing:
- Click the Microsoft Office button.
- Select Print
 Print Preview. The document opens in Print Preview format.
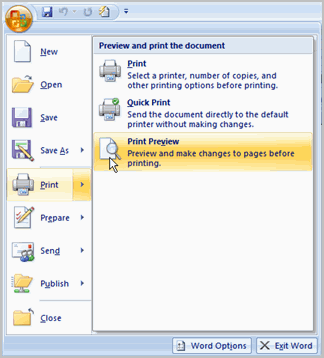
- Click Print to print the document or Close Print Preview to exit the preview format and make changes to the document.
- Modifying margins
- Changing page orientation
- Changing page size
- Zooming in and out to view various parts of the document
- Viewing multiple pages
- Accessing Word Options to change several Word settings
To print:
- Click the Microsoft Office button.
- Select Print
 Print. The Print dialog box appears.
 - Select the pages you want to print—either all pages or a range of pages.
- Select the number of copies.
- Check the Collate box if you are printing multiple copies of a multi-page document.
- Select a printer from the drop-down list.
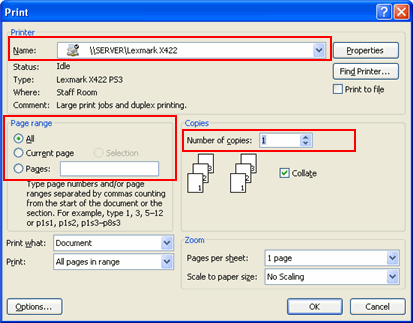
- Click OK.
To print via Quick Print:
- Click the Microsoft Office button.
- Select Print
 Quick Print.
 - The document automatically prints to the default printer.
Challenge!
Use the cover letter or any other Word document you choose to complete this challenge.
- Open an existing document.
- View the document in Print Preview.
- Close the Print Preview format without printing.
- Print two copies of the document.
To create a new blank document:
- Click the Microsoft Office button.
- Select New. The New Document dialog box appears.
- Select Blank document under the Blank and recent section. It will be highlighted by default.
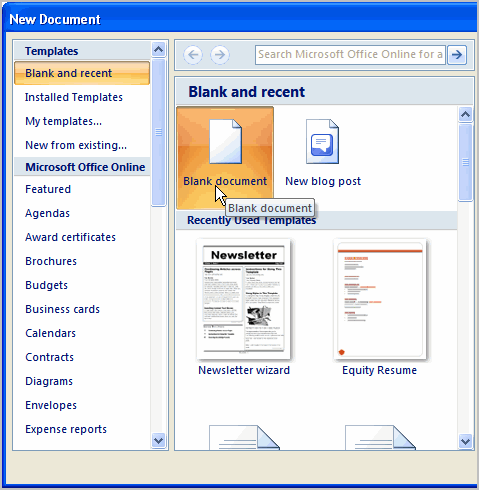
- Click Create. A new blank document appears in the Word window.
You can access templates that are installed on your computer or on Office Online. Click the Microsoft Office button and select New. You can create blank documents and access templates from the dialog box that appears.To format font size:
- Select the text you want to modify.
- Left-click the drop-down arrow next to the font size box on the Home tab. The font size drop-down menu appears.
- Move your cursor over the various font sizes. A live preview of the font size will appear in the document.
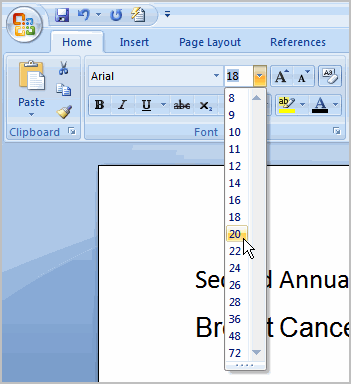
- Left-click the font size you want to use. The font size will change in the document.
To format font style:
- Select the text you want to modify.
- Left-click the drop-down arrow next to the font style box on the Home tab. The font style drop-down menu appears.
- Move your cursor over the various font styles. A live preview of the font will appear in the document.
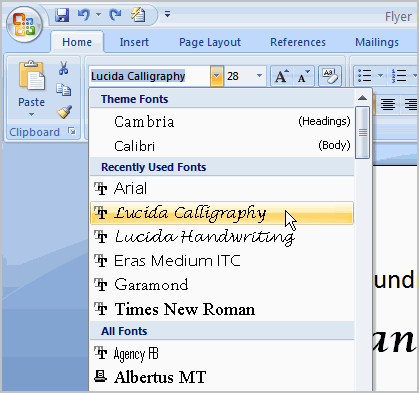
- Left-click the font style you want to use. The font style will change in the document.
To format font color:
- Select the text you want to modify.
- Left-click the drop-down arrow next to the font color box on the Home tab. The font color menu appears.
- Move your cursor over the various font colors. A live preview of the color will appear in the document.
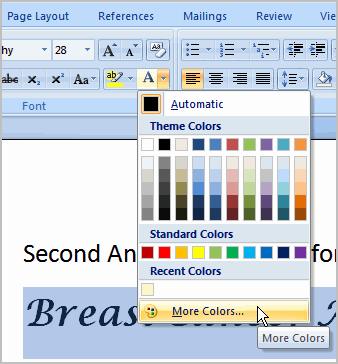
- Left-click the font color you want to use. The font color will change in the document.
Your color choices aren't limited to the drop-down menu that appears. Select More Colors at the bottom of the list to access the Colors dialog box. Choose the color you want, then click OK.To use the bold, italic, and underline commands:
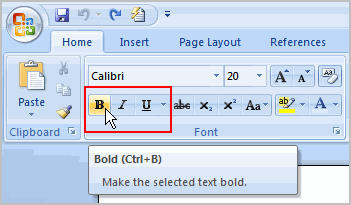
- Select the text you want to modify.
- Click the bold, italic, or underline command in the Font group on the Home tab.
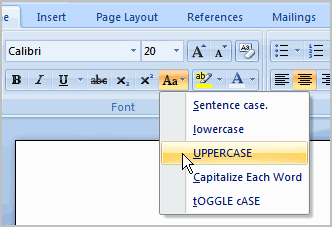
To change the text case:
- Select the text you want to modify.
- Click the Change Case command in the Font group on the Home tab.
- Select one of the case options from the list.
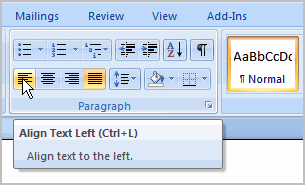
To change text alignment:
- Select the text you want to modify.
- Select one of the four alignment options from the Paragraph group on the Home tab.
- Align Text Left: Aligns all of the selected text to the left margin
- Center: Aligns text an equal distance from the left and right margins
- Align Text Right: Aligns all of the selected text to the right margin
- Justify: Aligns text equally to the right and left margins; used in many books, newsletters, and newspapers
To insert a text box:
- Select the Insert tab on the Ribbon.
- Click the Text Box command in the Text group.
- Select a Built-in text box or Draw Text Box from the menu.
- If you select Built-in text box, left-click the text box you want to use, and it will appear in the document.
OR - If you select Draw Text Box, a crosshair cursor will appear. Left-click your mouse and while holding it down, drag your mouse until the text box is the desired size.
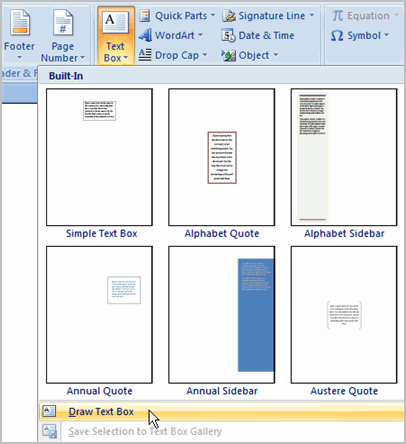
- Release the mouse button.
To change text box style:
- Select the text box. A new Format tab appears with Text Box Tools.

- Select the Format tab.
- Click the More drop-down arrow in the Text Box Style group to display more style options.
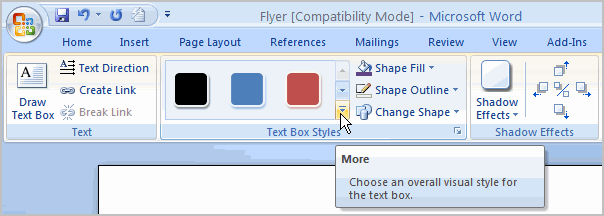
- Move your cursor over the styles, and Live Preview will preview the style in your document.
- Left-click a style to select it.
To change shape fill:
- Select the text box. A new Format tab appears with Text Box Tools.
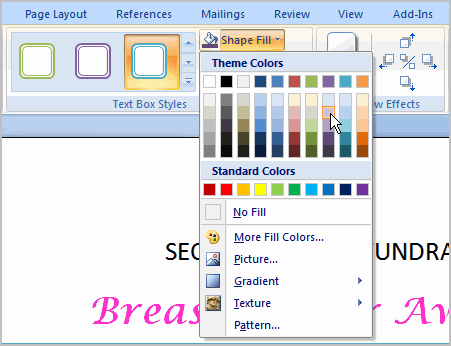
- Click the Shape Fill command to display a drop-down list.
- Select a color from the list, choose No Fill, or choose one of the other options.
To change the shape outline:
- Select the text box. A new Format tab appears with Text Box Tools.
- Click the Shape Outline command to display a drop-down list.
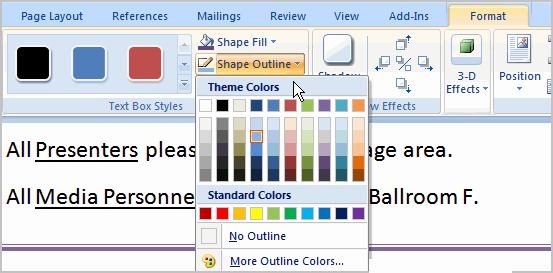
- Select a color from the list, choose No Outline, or choose one of the other options.
To change the text box shape:
- Select the text box. A new Format tab appears with Text Box Tools.
- Click the Change Shape command to display a drop-down list.
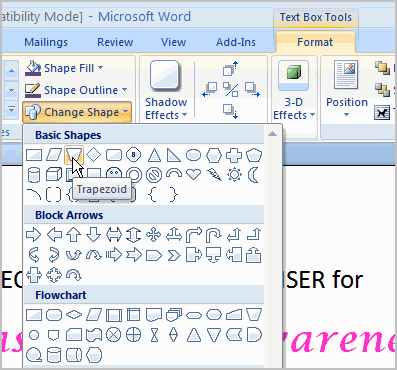
- Select a shape from the list.
To move a text box:
- Left-click the text box. Your cursor becomes a cross with arrows on each end.
- While holding the mouse button, drag the text box to the desired location on the page.
- Release the mouse button.
To resize a text box:
- Select the text box.
- Left-click one of the blue sizing handles.
- While holding down the mouse button, drag the sizing handle until the text box is the desired size.
If you drag the blue sizing handles on any of the four corners, the text box will resize in the same proportions. The sizing handles on the top or bottom of the text box will allow you to resize vertically, while the handles on the left and right sides will resize the text box horizontally.Challenge!
Use the flyer or any other Word document you choose to complete this challenge.
- Open an existing document.
- Insert a text box.
- Change the outline of the text box to a different color.
- Change the fill color of the text box.
- Move the text box to the desired location.
- Enter any text you want into the text box.
To locate clip art:
- Select the Insert tab.
- Click the Clip Art command in the Illustrations group.
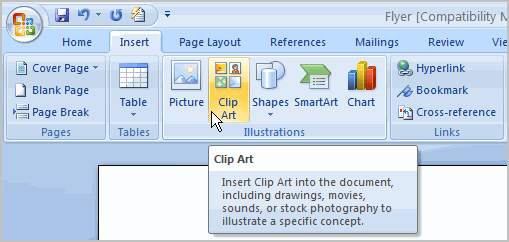
- The clip art options appear in the task pane on the right.
- Enter keywords in the Search for: field that are related to the image you want to insert.
- Click the drop-down arrow next to the Search in: field.
- Select Everywhere to ensure Word searches your computer and its online resources for an image that meets your criteria.
- Click the drop-down arrow in the Results should be: field.
- Deselect any types of images you do not want to see.
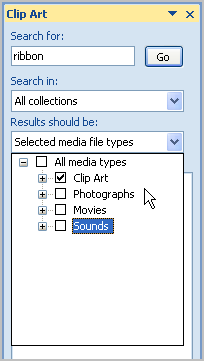
- Click Go.
To insert clip art:
- Review the results from a clip art search.
- Place your insertion point in the document where you want to insert clip art.
- Left-click an image in the task pane. It will appear in the document.
OR - Left-click the arrow next to an image in the task pane.
- Select Insert, Copy, or any of the other options on the list.
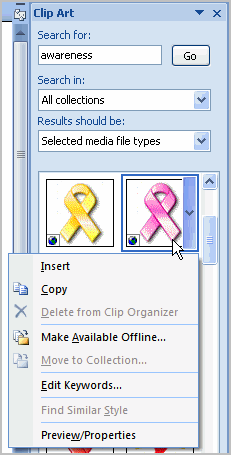
To insert a shape:
- Select the Insert tab.
- Click the Shape command.
- Left-click a shape from the menu. Your cursor is now a cross shape.
- Left-click your mouse and while holding it down, drag your mouse until the shape is the desired size.
- Release the mouse button.
To change shape style:
- Select the shape. A new Format tab appears with Drawing Tools.

- Click the More drop-down arrow in the Shapes Style group to display more style options.
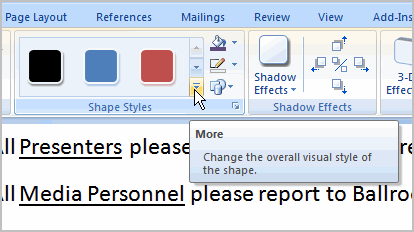
- Move your cursor over the styles, and Live Preview will preview the style in your document.
- Left-click a style to select it.
To change the shape fill color:
- Select the shape. A new Format tab appears with Drawing Tools.
- Click the Shape Fill command to display a drop-down list.
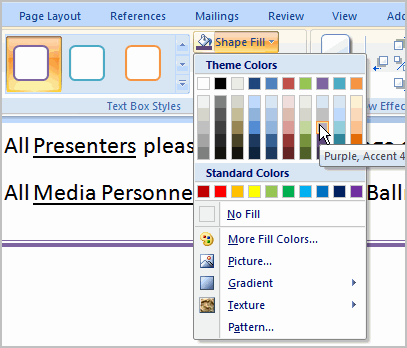
- Select a color from the list, choose No Fill, or choose one of the other options.
To change the shape outline:
- Select the shape. A new Format tab appears with Drawing Tools.
- Click the Shape Outline command to display a drop-down list.
- Select a color from the list, choose No Outline, or choose one of the other options.
To change to a different shape:
- Select the shape. A new Format tab appears with Drawing Tools.
- Click the Change Shape command to display a drop-down list.
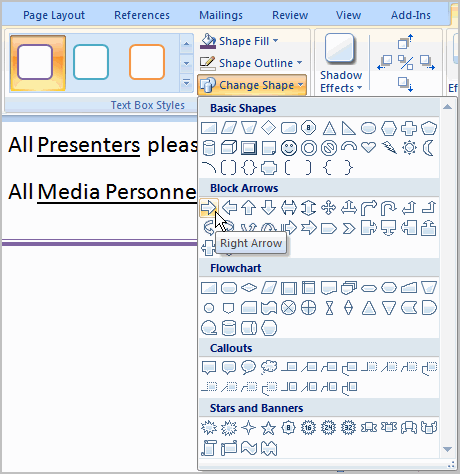
- Select a shape from the list.
To change shadow effects:
- Select the Format tab.
- Left-click the Shadow Effects command.
- Move your mouse over the menu options. Live Preview displays how it will appear in your document.
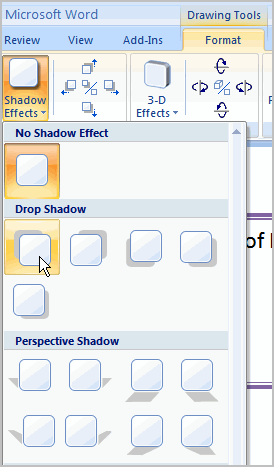
- Click an option to select the shadow effect.
Select Shadow Color from the menu, and choose a color from the palette to change the color of the shadow on your shape.To change 3D effects:
You cannot add a 3D effect to all shapes.- Select the Format tab.
- Left-click the 3-D Effects command.
- Move your mouse over the menu options. Live Preview displays how it will appear in your document.
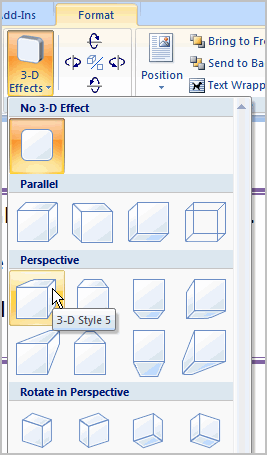
- Click an option to select the 3D effect.
After you have chosen a 3D effect, you can change other elements of your shape, including the color, depth, direction, lighting, and surface of the 3D effect on your shape. This can dramatically change the way the shape looks. You can access these options by clicking the 3-D Effects command.
Challenge!
Use the flyer or any other Word document you choose to complete this challenge.
- Open an existing Word document.
- Insert a shape.
- Change the shape to a different shape.
- Change the fill color.
- Change the line color.
- Try various shadow effects.
- Try various 3D effects.
To insert a template:
- Click the Microsoft Office button.
- Select New. The New Document dialog box appears.
- Select Installed Templates to choose a template on your computer.
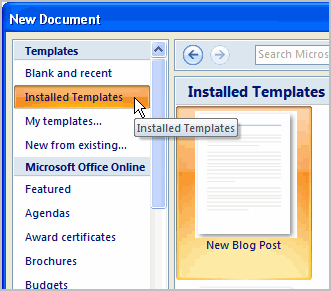
- Review the available templates.
- Left-click a template to select it.
- Click Create, and the template opens in a new window.
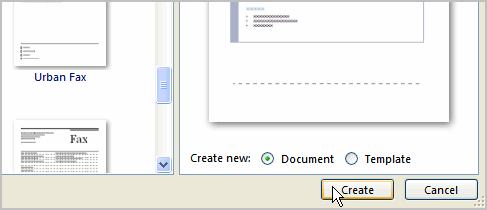 You can select any of the categories in the Microsoft Office Online section of the New Document Dialog box. This will display free templates that are available online. Your computer must have Internet access to download these templates.
Information about using templates
Templates include placeholder text that is surrounded by brackets. Often, this placeholder text includes information regarding the content for a specific area.
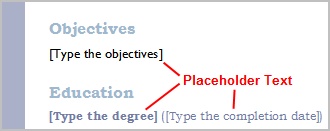
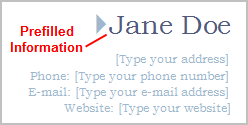
Additionally, some information is prefilled in the template. You can modify your Word Options and change the prefilled information that appears.
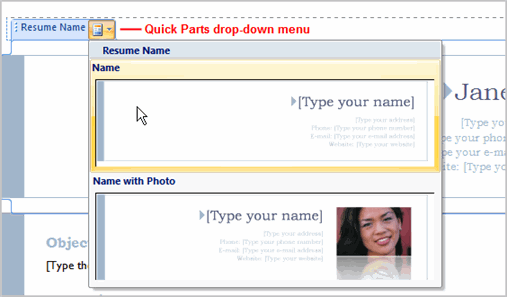
Word templates may include separate Quick Parts sections, which give you various options for the template.
To insert text into a template:
- Click near the text you want to replace. The text will appear highlighted, and a template tag will appear.
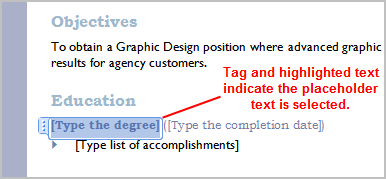
- Enter text. The placeholder text will disappear.
To change prefilled information:
- Select the Microsoft Office button.
- Click the Word Options button at the bottom of the menu. The Word Options dialog box appears.
- Enter the user name and/or initials in the Popular section.
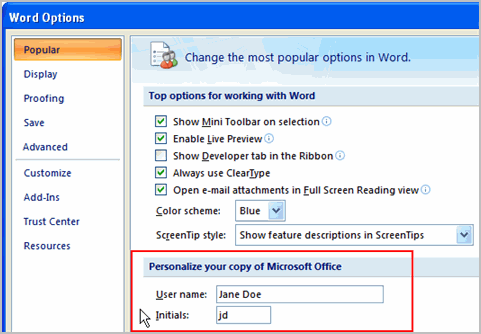
- Click OK.
Challenge!
- Create a new document using a template. Note: Choose the Origins Resume template to follow along with the video.
- Enter text into the template.
- Modify the user name and initials for your version of Word if you are using a home computer. Note: If you are using a public computer such as one at a library, you do not need to change these settings.
- Save the document.
To insert a new list:
- Select the text you want to format as a list.
- Click the Bullets or Numbering commands on the Home tab.
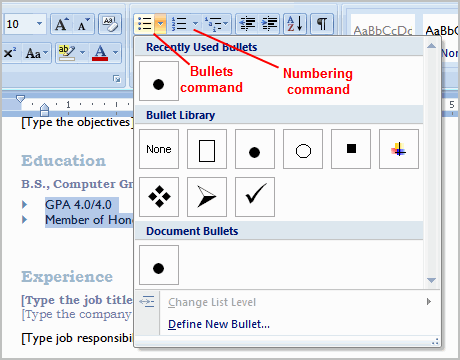
- Left-click the bullet or numbering style you want to use. It will appear in the document.
- Position your cursor at the end of a list item, and press the Enter key to add an item to the list.
To remove numbers or bullets from a list, select the list and click the Bullets or Numbering commands.To select an alternate bullet or numbering style:
- Select all of the text in an existing list.
- Click the Bullets or Numbering commands on the Home tab.
- Left-click to select an alternate bullet or numbering style.
Using bulleted lists
To use a symbol as a bullet:
- Select an existing list.
- Click the Bullets command.
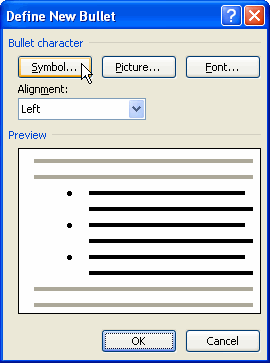
- Select Define New Bullet from the list. The Define New Bullet dialog box appears.
- Click the Symbol button. The Symbol dialog box appears.
- Click the Font: drop-down box, and select a font category.
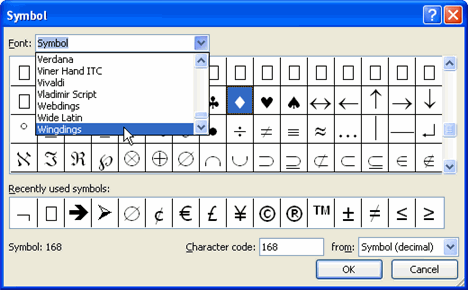
- Left-click a symbol to select it.
- Click OK. The symbol will now appear in the Preview section of the Define New Bullet dialog box.
- Click OK to apply the symbol to the list in the document.
You can use a picture as a bullet. Click the Picture button in the Define New Bullet dialog box, then locate the image file on your computer.To change the bullet color:
- Select an existing list.
- Click the Bullets command.
- Select Define New Bullet from the list. The Define New Bullet dialog box appears.
- Click the Font button. The Font dialog box appears.
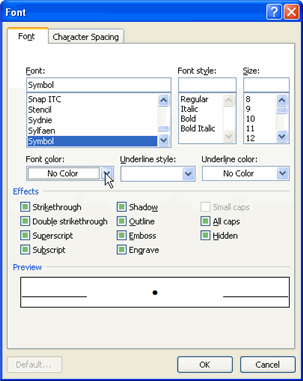
- Click the Font color: drop-down box.
- Left-click a color to select it.
- Click OK. The bullet color will now appear in the Preview section of the Define New Bullet dialog box.
- Click OK to apply the bullet color to the list in the document.
You can also change the bullet font and formatting in the Font dialog box.
Challenge!
Use the resume or any Word template you choose to complete this challenge.
- Change the bullet of an existing list to a different bullet.
- Insert a new numbered list into the document.
- Modify the color of a bullet.
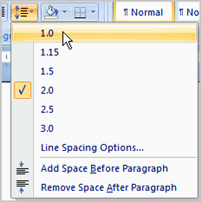
To format line spacing:
- Select the text you want to format.
- Click the Line spacing command in the Paragraph group on the Home tab.
- Select a spacing option.
OR
- Select Line Spacing Options. The Paragraph dialog box appears.
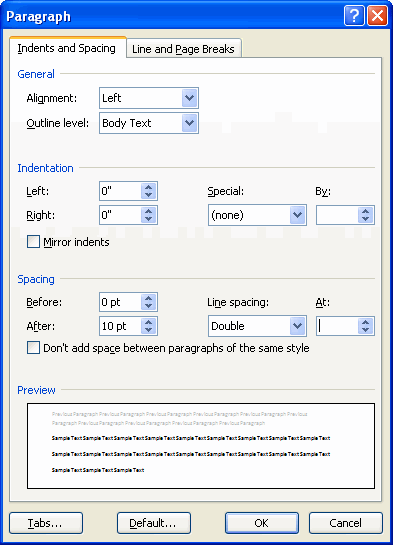
- Use the Line spacing drop-down menu to select a spacing option.
- Modify the before and after points to adjust line spacing as needed.
- Click OK.
Paragraph spacing
Just as you can format spacing between lines in your document, you can choose spacing options between each paragraph. Typically, extra spaces are added between paragraphs, headings, or subheadings. Extra spacing between paragraphs adds emphasis and makes a document easier to read.
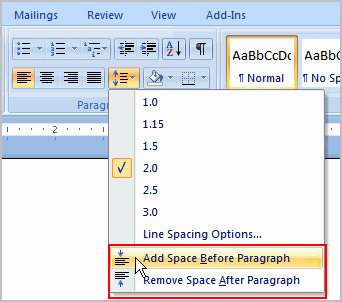
To format paragraph spacing:
- Click the Line spacing command on the Home tab.
- Select Add Space Before Paragraph or Remove Space After Paragraph from the menu. If you don't see the option you want, click Line Spacing Options to manually set the spacing (see below).
OR
- Select Line Spacing Options. The Paragraph dialog box appears.
- Change the Before and After points in the Paragraph section.
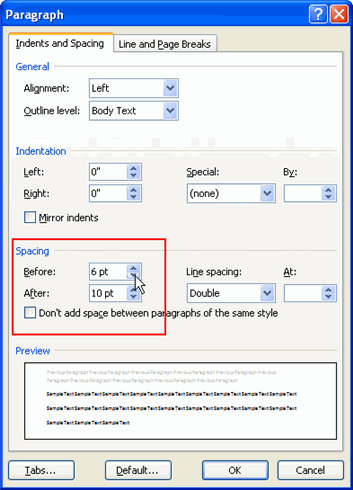
- Click OK.
Line spacing is measured in lines or points, which is referred to as leading. When you reduce the leading, you automatically bring the lines of text closer together. Increasing the leading will space the lines out, allowing for improved readability.
Challenge!
Use the resume or any Word template you choose to complete this challenge.
- Change the line spacing of a list.
- Change the line spacing of a paragraph of text.
- Change the paragraph spacing between body text and a heading.
PAGE LAYOUT
To change page orientation:
- Select the Page Layout tab.
- Click the Orientation command in the Page Setup group.
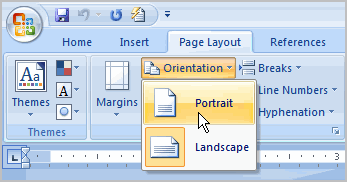
- Left-click either Portrait or Landscape to change the page orientation.
Landscape format means everything on the page is oriented horizontally, while portrait format means everything is oriented vertically.To change the paper size:
- Select the Page Layout tab.
- Left-click the Size command, and a drop-down menu will appear. The current paper size is highlighted.
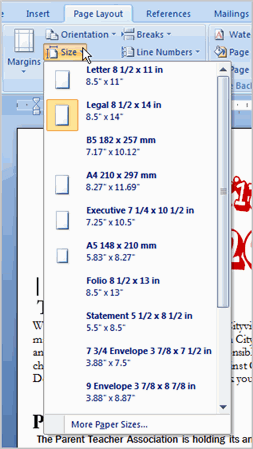
- Left-click a size option to select it. The page size of the document changes.
To format page margins:
- Select the Page Layout tab.
- Click the Margins command. A menu of options appears. Normal is selected by default.
- Left-click the predefined margin size you want.
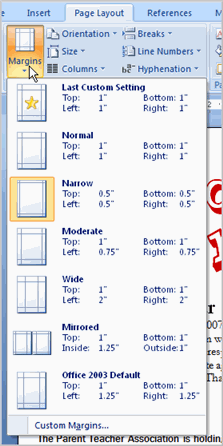
OR
- Select Custom Margins from the menu. The Page Setup dialog box appears.
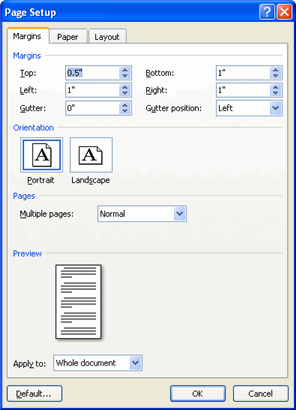
- Enter the desired margin size in the appropriate fields.
You can always access the Page Setup dialog box by clicking the small arrow in the bottom-right corner of the Page Setup group. The dialog box should look familiar to people who have used previous versions of Word.To insert a break:
- Place your insertion point where you want the break to appear.
- Select the Page Layout tab.
- Click the Breaks command. A menu appears.
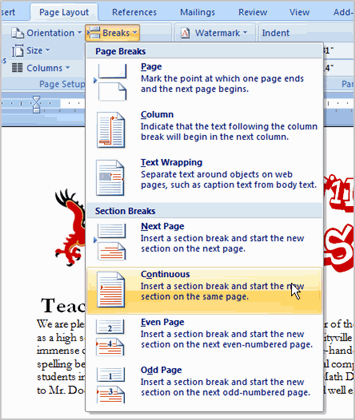
- Left-click a break option to select it. The break will appear in the document.
Why would you need to use a break? Each type of break serves a different purpose and will affect the document in different ways. Page breaks move text to a new page before reaching the end of a page, while section breaks create a barrier between parts of the document for formatting purposes. Column breaks split text in columns at a specific point. Practice using the various break styles to see how they affect the document.
Challenge!
Use the newsletter or any Word document you choose to complete this challenge.
- Change the page orientation.
- Change the paper size.
- Modify at least one margin.
- Insert a section break.
To insert a picture:
- Place your insertion point where you want the image to appear.
- Select the Insert tab.
- Click the Picture command in the Illustrations group. The Insert Picture dialog box appears.
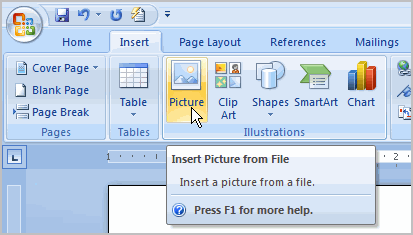
- Select the image file on your computer.
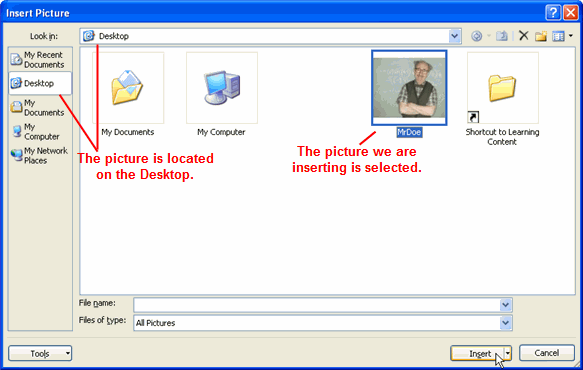
- Click Insert, and it will appear in your document.
Left-click a corner sizing handle, and while holding down the mouse button resize the image. The image retains its proportions.To wrap text around an image:
- Select the image.
- Select the Picture Tools Format tab.
- Click the Text Wrapping command in the Arrange group.
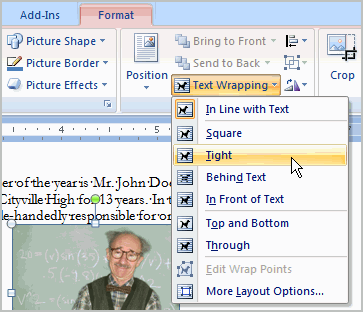
- Left-click a menu option to select it. In this example, we selected Tight.
- Move the image around to see how the text wraps for each setting.
- The Position button has predefined text wrapping settings. The Position button is located to the left of the Text Wrapping button.
- Click the Position button, and a drop-down list of text wrapping options will appear. Hover over an option to see what it does.
If you can’t get your text to wrap the way you want, click the Text Wrapping command and select More Layout Options from the menu. You can make more precise changes in the Advanced Layout dialog box that appears.
To crop an image:
- Select the image.
- Select the Format tab.
- Click the Crop command. The black cropping handles appear.
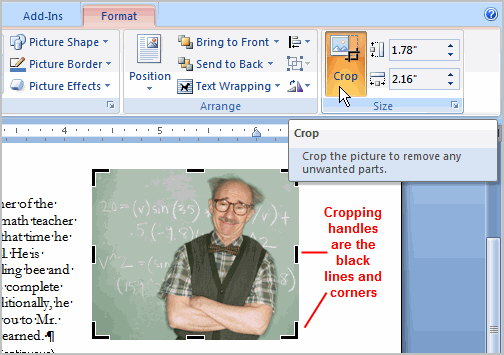
- Left-click and move a handle to crop an image.
- Click the Crop command to deselect the crop tool.
Corner handles will crop the image proportionally.To compress a picture:
- Select the picture.
- Select the Format tab.
- Click the Compress Pictures command in the Adjust group. A dialog box appears.
- Click the Options button to access the Compression Setting dialog box.
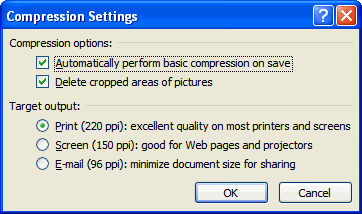
- Choose the target output.
- Change any of the default picture settings you want.
- Click OK in the Compression Settings dialog box.
- Click OK in the Compress Pictures dialog box.
You need to monitor the file size of your images and documents that include images, especially if you send them via email. Cropping and resizing an image doesn’t decrease the image file size, but compression does.Other picture tools
There are many other things you can do to modify a picture. From the Format tab, some of the other useful commands include:
- Change Picture: Selects a new picture from your computer
- Reset Picture: Reverts to original image
- Brightness: Adjusts the brightness of an image
- Color: Adjusts the contrast of an image from light to dark
- Recolor: Modifies the color in a variety of ways, including black and white, sepia, pink, and purple

To change the shape of a picture:
- Select the picture.
- Select the Format tab.
- Click the Picture Shape icon. A menu appears.
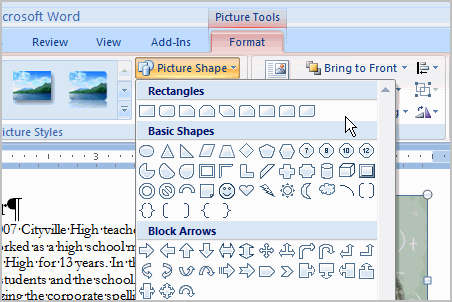
- Left-click a shape to select it.
To apply a picture style:
- Select the picture.
- Select the Format tab.
- Click the More drop-down arrow to display all of the picture styles.
- Hover over a picture style to display a live preview of the style in the document.
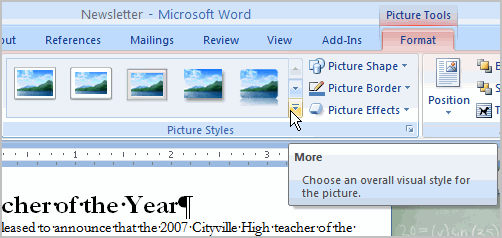
- Left-click a style to select it.
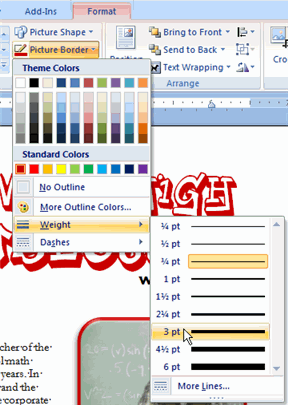
To add a border to a picture manually:
- Select the picture.
- Select the Format tab.
- Left-click the Picture Border command, and select a color.
- Select Weight from the menu and choose a line weight.
Challenge!
Use the newsletter or any Word document you choose to complete this challenge.
- Insert a picture into a document.
- Crop the image proportionally.
- Apply a picture style to the image.
- Compress the picture.
To add columns to a document:
- Select the text you want to format.
- Select the Page Layout tab.
- Left-click the Columns command.
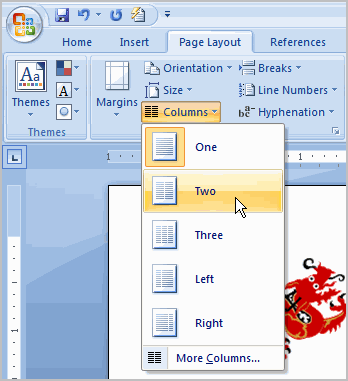
- Select the number of columns you want to insert.
Click the Show/Hide command on the Home tab to display the paragraph marks and breaks.The Format Painter command allows you to easily format text to appear like other text in your document. Select the text that is formatted the way you want, click the Format Painter command on the Home tab, and select the text you want to change. The new text now appears modified.To change the order of objects:
- Right-click the object you want to move. In this example, click the shape.
- In the menu that appears, select Order.
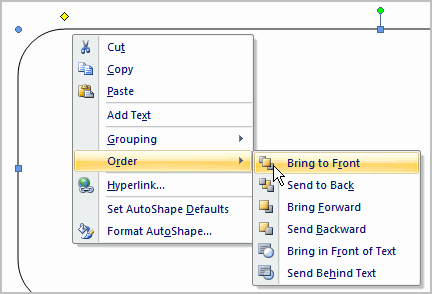
- Select a menu option that will arrange the item in the desired way. In this example, select Send Behind Text.
- The text and image are now displayed layered on top of the shape.

Challenge!
Use the newsletter or any Word document you choose to complete this challenge.
- Select text you want to format into columns.
- Format the selected text into two columns.
- Insert a picture and a shape.
- Practice ordering using the picture and shape.
To insert a header or footer:
- Select the Insert tab.
- Click either the Header or Footer command. A menu appears with a list of built-in options you can use.
- Left-click one of the built-in options, and it will appear in the document.
OR - Left-click Blank to select it.
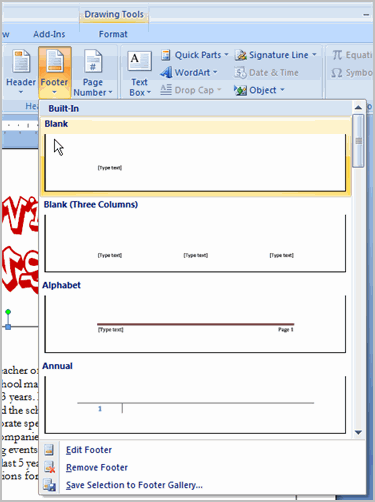
- The Design tab with Header and Footer tools is active.

- Type information into the header or footer.
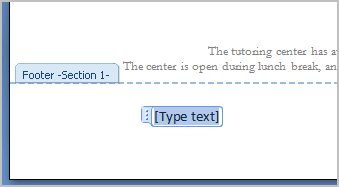
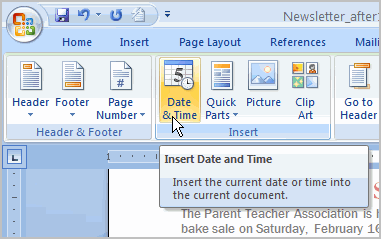
To insert the date or time into a header or footer:
- With the header or footer section active, click the Date & Time command.
- Select a date format in the dialog box that appears.
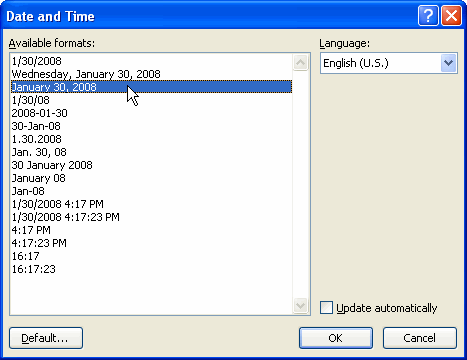
- Click OK. The date and time now appear in the document.
Other header and footer options
There are many other header and footer options you can use to design these sections of your document. From the Header and Footer Tools Design tab, you can see all of your design options.

Challenge!
Use the newsletter or any Word document you choose to complete this challenge.
- Add your name in the header of a document.
- Right-align the text in the header.
- Select a built-in footer with a page number.
To convert existing text to a table:
- Select the text you want to convert.
- Select the Insert tab.
- Click the Table command.
- Select Convert Text to Table from the menu. A dialog box appears.
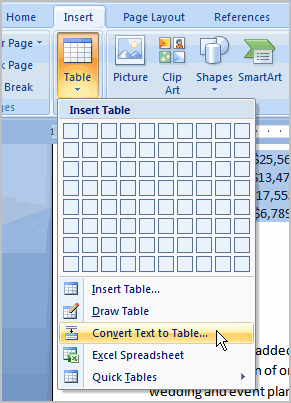
- Choose one of the options in the Separate text at: section. This is how Word knows what text to put in each column.
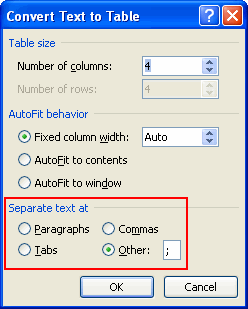
- Click OK. The text appears in a table.
To add a row above an existing row:
- Place the insertion point in a row below the location where you want to add a row.

- Right-click the mouse. A menu appears.
- Select Insert
 Insert Rows Above.
A new row appears above the insertion point.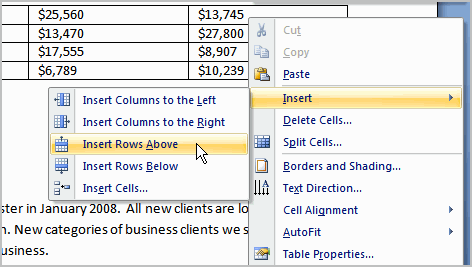
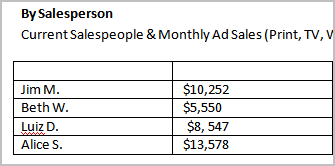 You can also add rows below the insertion point. Follow the same steps, but select Insert Rows Below from the menu.
To add a column:
- Place the insertion point in a column adjacent to the location where you want the new column to appear.
- Right-click the mouse. A menu appears.
- Select Insert
 Insert Columns to the Left or Insert Columns to the Right. A new column appears.
To delete a row or column:
- Select the row or column.
- Right-click your mouse, and a menu appears.
- Select Delete Columns or Delete Rows.
To apply a table style:
- Select the table. A Table Tools Design tab now appears on the Ribbon.
- Select the Design tab to access all of the Table Styles and Options.

- Click through the various styles in the Table Styles section.
- Left-click a style to select it. The table style will appear in the document.
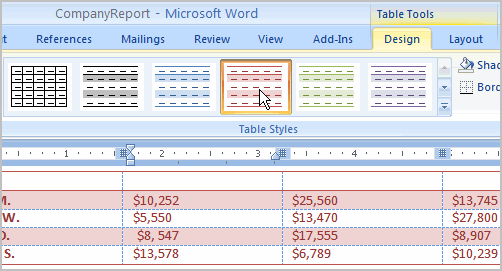 You can modify which table styles are displayed. In the Table Styles Options, you can select and deselect various table options. For example, you can select banded rows, and only tables with banded rows will appear in the Tables Styles section.Want to have a little more creative freedom when it comes to formatting your tables? You can manually change the table border or shading, change line weight, or erase part of the table.
To insert a blank table:
- Place your insertion point in the document where you want the table to appear.
- Select the Insert tab.
- Click the Table command.
- Drag your mouse over the diagram squares to select the number of columns and rows in the table.
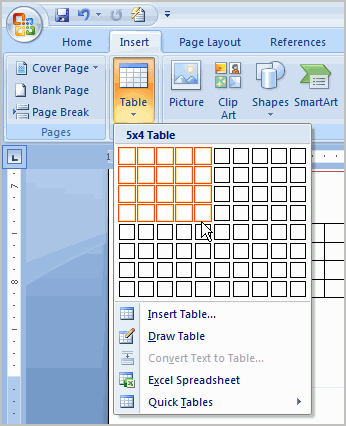
- Left-click your mouse, and the table appears in the document.
- Enter text into the table.
Modifying a table using the layout tab
When you select a table in Word 2007, Design and Layout tabs appear under Table Tools on the Ribbon. Using commands on the Layout tab, you can make a variety of modifications to the table, including:
- Adding and deleting columns
- Adding and deleting rows
- Changing the cell size
- Aligning cell text
- Changing text direction
- Merging and splitting cells

Challenge!
Use the report or any Word document you choose to complete this challenge.
- Convert text into a table.
- Apply a table style.
- Delete a row from the table.
- Insert a blank table with five rows and four columns.
To insert a SmartArt illustration:
- Place the insertion point in the document where you want the graphic to appear.
- Select the Insert tab.
- Select the SmartArt command in the Illustrations group. A dialog box appears.
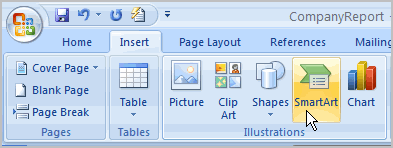
- Select a category on the left of the dialog box, and review the SmartArt graphics that appear in the center.
- Left-click a graphic to select it.
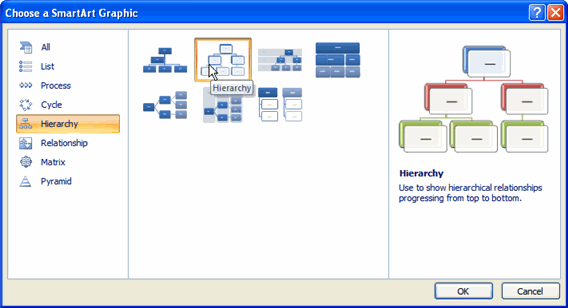
- Click OK.
To see more details about a graphic, left-click any image, and a larger version of the graphic and additional text details will appear on the right side of the dialog box.To add text to a SmartArt graphic:
- Select the graphic. The first text box is selected. If the task pane on the left of the graphic is visible, the insertion point appears in it. If the task pane is not visible, click the arrow to open the task pane.
- Enter text into the task pane fields. The information will appear in the graphic.
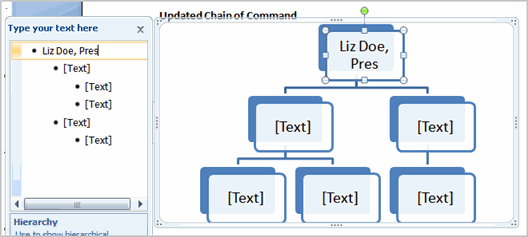
OR
- Click X to close the task pane.
- Enter text into the first text box in the graphic.
- Continue to enter text in the text box graphics.
Notice that the text you enter automatically resizes to fit inside the box.To add a shape to a graphic:
- Select the graphic. The SmartArt Tools Design and Format tabs appear on the Ribbon.
- Select the Design tab.
- Click the Add Shape command in the Graphics group.
- Decide where you want the new shape to appear, and select one of the shapes nearby the desired location.
- Select Add Shape Before or Add Shape After. If you wanted to add a superior or a subordinate, you could select the Above or Below options.
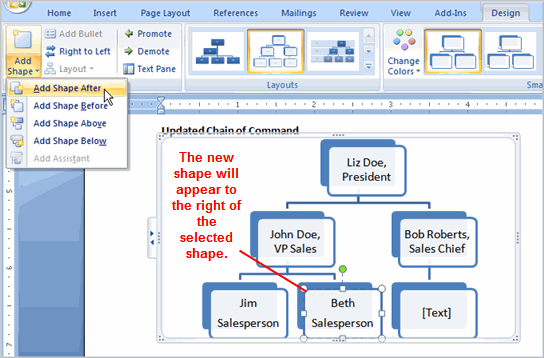
To move shapes using the Promote or Demote commands:
- Select the graphic. The SmartArt Tools Design and Format tabs appear on the Ribbon.
- Select the Design tab.
- Select the shape you want to move.
- Click the Promote or Demote command in the Create Graphic group.
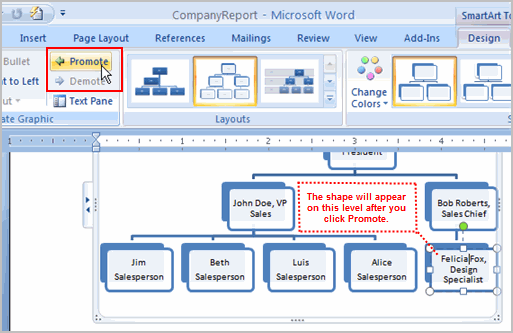 The Promote and Demote commands allow you to move shapes and customize the graphic instead of having to use the predefined default illustration.
To change the graphic style:
- Select the graphic. The SmartArt Tools Design and Format tabs appear on the Ribbon.
- Select the Design tab.
- Left-click a style to select it.
 Click the More arrow to see all of the style options. Hover over each to display a live preview of the style in your document.
To change the color scheme:
- Select the graphic. The SmartArt Tools Design and Format tabs appear on the Ribbon.
- Select the Design tab.
- Click the Change Color command. A menu of color schemes appears.
- Left-click an option to select it.
Explore the options in the Layout group if you want to switch to another graphic but keep the existing text. You also can select the Format tab to access additional formatting options, including fill, text, and line color.Some of the options will differ from graphic to graphic. Look carefully at the SmartArt Tools tabs, and explore the active commands.
Challenge!
Use the report or any Word document you choose to complete this challenge.
- Insert a SmartArt illustration into a document.
- Enter text into the graphic.
- Modify the style.
- Modify the graphic as needed.
To indent using the Tab key:
The most common way to indent is to use the Tab key. This method is best for indenting one line of text rather than multiple lines.
- Place the insertion point to the left of the text you want to indent.
- Press the Tab key. This indents the line 1/2 inch by default.
To use the Indent commands:
Using the Tab key to indent multiple lines can make formatting difficult if you add or remove text later. Indenting multiple lines is best done using the Indent commands.
- Select the text you want to indent.
- Click the Increase Indent command to increase the indent. The default is 1/2 inch. You can press the command multiple times.
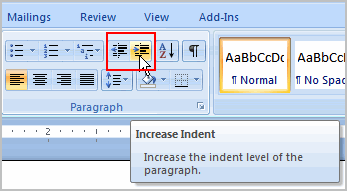
- Click the Decrease Indent command to decrease the indent.
To modify the default indent settings:
- Select the Page Layout tab.
- Select the text you want to modify.
- Use the arrows or enter text in the fields to modify the Left and Right Indents.

The tab selector
The tab selector is located above the vertical ruler on the left. Hover over the tab selector to see the name of the type of tab that's active.
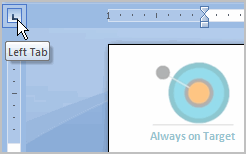
Tab options include:
- First Line Indent
 : Inserts the indent marker on the ruler, and indents the first line of text in a paragraph
 - Hanging Indent
 : Inserts the hanging indent marker, and indents all lines other than the first line
 - Left Tab
 : Moves text to the right as you type
 - Center Tab
 : Centers text according to the tab
 - Right Tab
 : Moves text to the left as you type
 - Decimal Tab
 : Aligns decimal numbers using the decimal point
 - Bar Tab
 : Draws a vertical line on the document
To set a tab stop to indent the first line of text:
- Click the tab selector until the First Line Indent icon is visible.
- Left-click at any point on the horizontal ruler. The First Line Indent icon will appear.
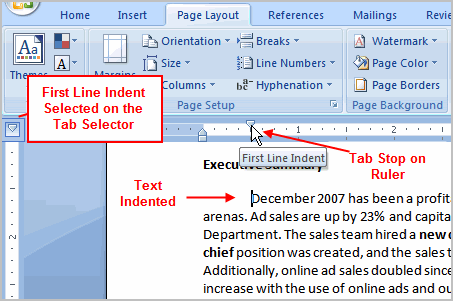
- Press the Enter key to start a new paragraph, and your insertion point will automatically indent to that point.
To move a tab stop once you have inserted it, left-click and drag the tab stop back and forth on the ruler.You can set a hanging indent the same way; however, this tab stop changes all other lines in a paragraph.To set the left, center, right, and decimal tab stops:
- Click the tab selector until the tab stop you want to use appears.
- Left-click the location on the horizontal ruler where you want your text to appear.
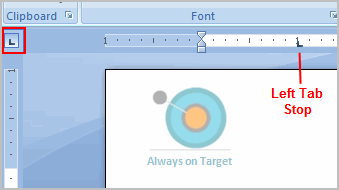
- Press the Tab key to reach the tab stop.
To use Find and Replace to replace existing text:
- Click the Replace command on the Home tab. The Find and Replace dialog box appears.
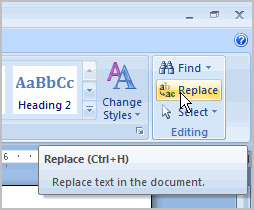
- Enter text in the Find field that you want to locate in your document.
- Enter text in the Replace field that will replace the text in the Find box.
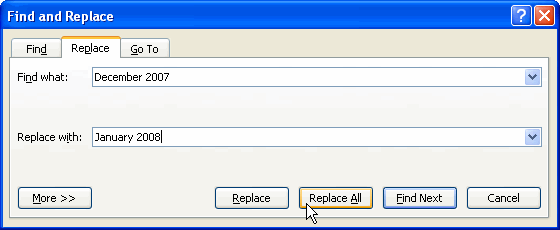
- Click OK. The change is made in the document.
You can also use the Find command to locate specific information in a document. For example, if you are working with a 20-page report, it would be time consuming to search the document for a specific topic. You can use the Find command to locate all instances of a word or phrase in the document. This is a great way to save time when working with longer documents.
Challenge!
Use the report or any Word document you choose to complete this challenge.
- Practice using the Tab key to indent the first line of a paragraph.
- Select some text, and use the Increase and Decrease Indent commands to see how they change the text.
- Explore the tab selector and all of the tab stops. Practice using each one.
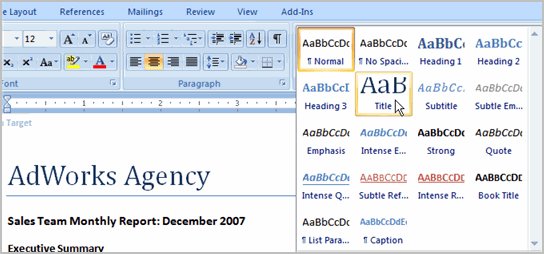
To select a style:
- Select the text to format. In this example, the title is selected.
- In the Style group on the Home tab, hover over each style to see a live preview in the document. Click the More drop-down arrow to see additional styles.

- Left-click a style to select it. Now the selected text appears formatted in the style.
 You can also use styles to create a table of contents for your document. To learn how, review our article on How to Create a Table of Contents in Microsoft Word.
To modify a style:
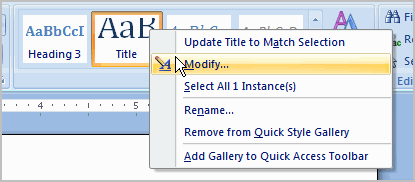
- Select the text in the style you want to change. In this example, we are changing AdWorks Agency, which has the Title style applied.
- Locate the style in the Styles group.
- Right-click the style, and a menu appears.
- Left-click Modify, and the Modify Style dialog box appears.
- Change any of the formatting.
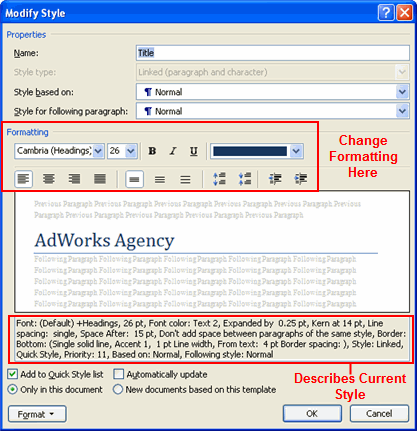
- Click OK to apply the modifications to the style.
To create a new style:
- Click the arrow in the bottom-right corner of the Styles group. This opens the Styles task pane.
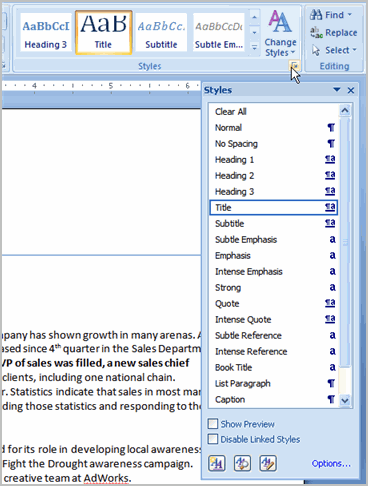
- Click the New Style button at the bottom, and a dialog box appears.
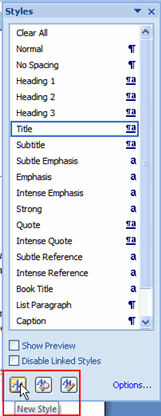
- Enter a name for the style, and make all of the formatting decisions.
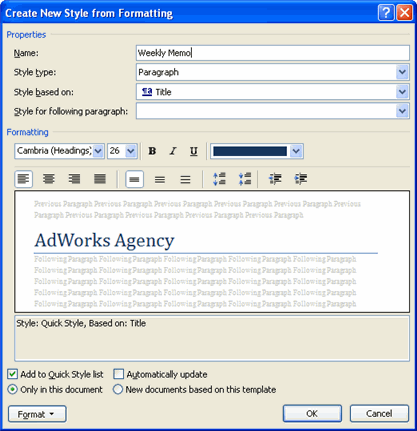
- Select the button beside New Document based on this template so the style will be available to use in all of your documents.
- Click OK. The new style will appear in the list.
To apply a style set:
- Click the Change Styles command on the Ribbon.
- Select Style Set from the menu that appears.
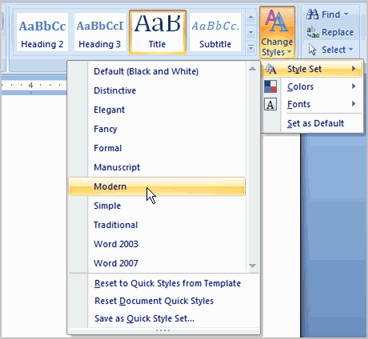
- Left-click a style set to select it. The change is reflected in the entire document.
Style sets include a combination of title, heading, and paragraph styles. Style sets allow you to format all of the elements of your document at once, rather than formatting your title and headings separately.For quick changes, you can modify the colors and fonts of a style set from the Change Styles command; however, the themes feature is more comprehensive and easier to use.
To apply a theme:
- Select the Page Layout tab.
- Click the Themes command.
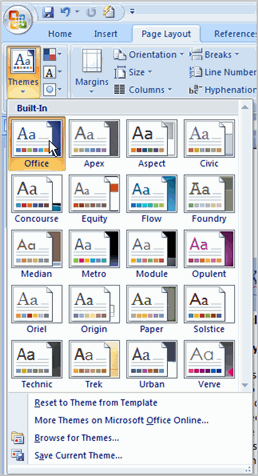
- Hover your pointer over a theme to see it displayed in the document.
- Left-click a theme to select it.
A document theme is a set of formatting choices that includes font styles, sizes, and colors for different parts of the document, as well as a set of theme effects such as lines and fill effects.To create a custom theme:
- Open the document you want to format.
- Select the Page Layout tab.
- Click the Colors command.
- Select Create New Theme Colors. A dialog box appears.
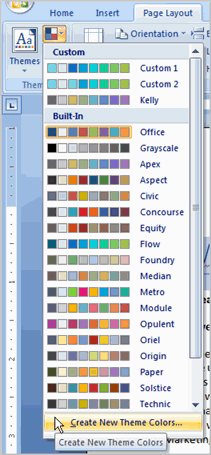
- Use the drop-down menus to change the colors for each part of the document.
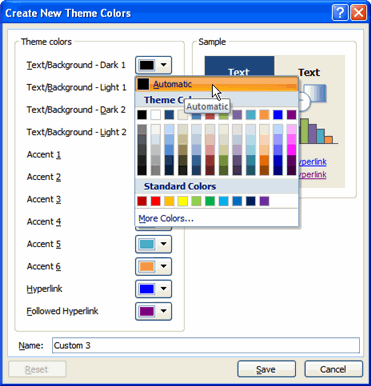
- Enter a name for the theme color.
- Click Save.
- Click the Fonts command.
- Select Create New Theme Fonts. A dialog box appears.
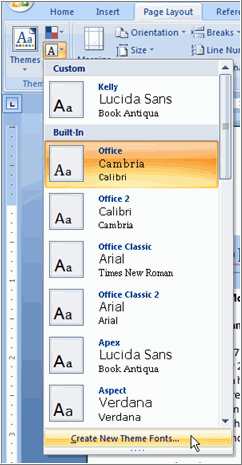
- Use the drop-down menus to change the fonts in the dialog box.
- Enter a name for theme font.
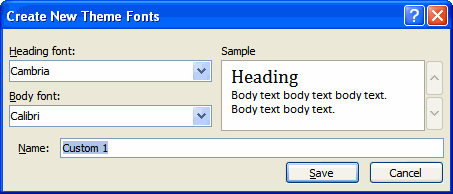
- Click Save.
- Click the Effects command, and select an option from the drop-down menu.
- Click the Themes command.
- Select Save Current Theme. A dialog box appears.
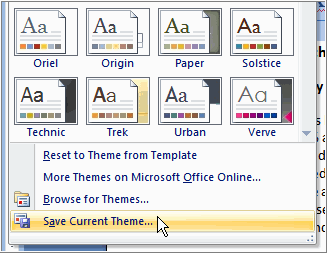
- Enter a theme name, and click Save. Now the theme is available to use with other documents.
You cannot apply a theme to a document without applying styles first. Themes look for and replace the formats of each of the styles.
Challenge!
Use the report or any Word document you choose to complete this challenge.
- Apply a style to one section of your document.
- Apply a style set to your entire document.
- Modify an existing style.
- Apply a theme.
To use Mail Merge:
- Select the Mailings on the Ribbon.
- Select the Start Mail Merge command.

- Select Step by Step Mail Merge Wizard.
Steps 1-3
- Choose the type of document you want to create. In this example, select Letters.
- Click Next:Starting document to move to Step 2.
- Select Use the current document.
- Click Next:Select recipients to move to Step 3.
- Select the Type a new list button.
- Click Create to create a data source. The New Address List dialog box appears.
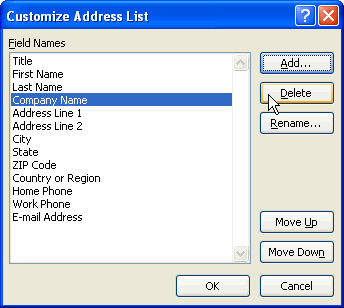
- Click Customize in the dialog box. The Customize Address List dialog box appears.
- Select any field you do not need, and click Delete.
- Click Yes to confirm that you want to delete the field.
- Continue to delete any unnecessary fields.
- Click Add. The Add Field dialog box appears.
- Enter the new field name.
- Click OK.
- Continue to add any fields necessary.
- Click OK to close the Customize Address List dialog box.
To customize the new address list:
- Enter the necessary data in the New Address List dialog box.
- Click New Entry to enter another record.
- Click Close when you have entered all of your data records.
- Enter the file name you want to save the data list as.
- Choose the location where you want to save the file.
- Click Save. The Mail Merge Recipients dialog box appears and displays all of the data records in the list.
- Confirm that the data list is correct, and click OK.
- Click Next:Write your letter to move to Step 4.
Steps 4-6
- Write a letter in the current Word document, or use an open existing document.
To insert recipient data from the list:
- Place the insertion point in the document where you want the information to appear.
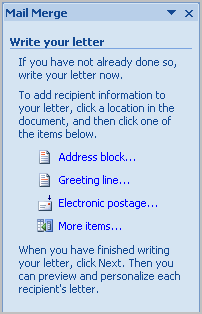
- Select Address block, Greeting line, or Electronic postage from the task pane. A dialog box with options will appear based on your selection.
- OR
- Select More Items. The Insert Merge Field dialog box will appear.
- Select the field you want to insert in the document.
- Click Insert. Notice that a placeholder appears where information from the data record will eventually appear.
- Repeat these steps each time you need to enter information from your data record.
- Click Next: Preview your letters in the task pane once you have completed your letter.
- Preview the letters to make sure the information from the data record appears correctly in the letter.
- Click Next: Complete the merge.
- Click Print to print the letters.
- Click All.
- Click OK in the Merge to Printer dialog box.
- Click OK to send the letters to the printer.
The Mail Merge Wizard allows you to complete the merge process in a variety of ways. The best way to learn how to use the different functions in Mail Merge is to try to develop several of the different documents—letters, labels, and envelopes—using the different types of data sources.
Challenge!
Use the report or any Word document you choose to complete this challenge.
- Open a new blank Word document.
- Open the Mail Merge task pane.
- Create a data list, and practice adding and removing fields.
- Explore the different Mail Merge features until you are familiar with them.

ConversionConversion EmoticonEmoticon